One way to automate your business processes is with Workflow Rules. If you schedule tasks from field data updates, rules are the way to go! Workflows let you trigger on almost any Salesforce Object. If the criteria for the trigger is met, an action takes place. One of the available actions is to schedule a task.
The task can be assigned to a user, role, or the record owner. The Subject, Due Date, Comments, Status and Priority can be configured.
Tasks can be used to schedule a birthday call for a client or reminder call on a contract due date. Since Workflow Rules can trigger on most objects, they can be scheduled to follow up on Cases or Opportunities too!
For this example we will create a task for the record owner when the Active data field is updated to Yes so they can call the client and welcome them and start onboarding.
There are 3 steps to creating a Workflow Rule:
- Select the Object to trigger on – Account object / Active field
- Configure the rule criteria – When a record is created or updated to meet the criteria of Account:Active = Yes
- Configure the action to perform if the rule is met – A task for the record owner 1 day after trigger date
- Go to Setup (Gear Icon) and type “Workflow Rules” into the Quick Find Click on Workflow Rules.
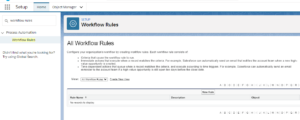
- Click the New Rule
- Select the object you want to ‘trigger’ on. For this example we want to trigger on the Account Active Status field so Account is chosen. Click Next.

- Next, give the Rule a name and configure the criteria. For this example the criteria will be:
Evaluation Criteria: Created, and any time its’ edited to subsequently meet criteria. This means it will look at the value of the Active field when an Account is initially created AND when the field is changed to meet the Rule Criteria.
Rule Criteria: Account:Active equals ‘Yes’. This means the Account object’s Active field must equal ‘Yes’ in order to perform the action.
**Use Filter Logic to add AND /OR statements to the rule criteria for more flexibility.
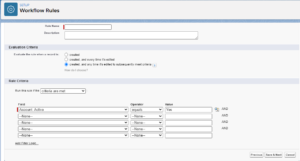
- Click the Save & Next
- Click the Add Workflow Action dropdown and choose New Task.
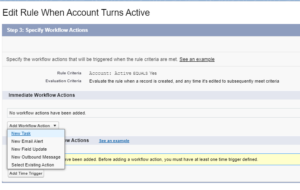
- Configure the task to be schedule when the Account’s Active field equals ‘Yes. For this example the criteria will be:
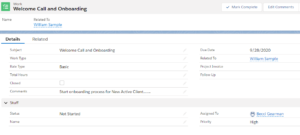
Assigned to the Account Owner
Subject = Welcome Call and Onboarding
Due Date = 1 day after the workflow rule triggers
Status = Not Started
Priority = High
Comments = Additional notes/directions
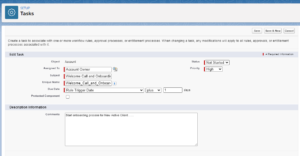
- Click the Save The new workflow rule is created. Click the Done button.
- Before you can test OR implement, you must click on the Activate button at the top of the page.
- Test the rule and make any necessary edits until it is working correctly.
- To make edits to a Workflow Rule, click the Edit button in the Workflow Rule Detail section.
- To make edits to the task, click the Edit button in the Workflow Action section.


