Category

GoldMine CRM

GoldMine – Adding the Read Only User

By CRM, GoldMine CRM No Comments

So you’ve successfully upgraded GoldMine to the lastest 2018 version.  Everything is working except you are getting an error when trying to run a filter or query and possibly the Contact Search Center.  This is because the new versions require a read only user be added for querying the database.

Don’t worry though.  You can quickly add it to GoldMine and filters/queries will work.

To add the read only user to GoldMine:

  1. You must be logged in as a user with Master rights
  2. Navigate to Tools -> Databases -> Alias Manager
  3. Select the database you are using from the list and click Edit Alias
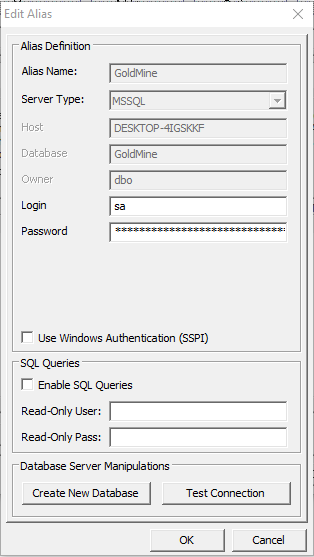
  1. Check the Enable SQL Queries checkbox
  2. Type “ReadOnlyUser” into the Read-Only User box
  3. Type in a password for the user. It is suggested using the same password as the SQL sa account
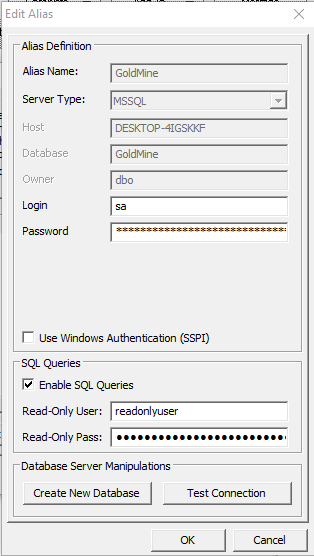
  1. Click OK to save
  2. GoldMine will close. Log in.
  3. Go to Filters and preview a filter to ensure it works

GoldMine – Add Holidays to the Calendar

By CRM, GoldMine CRM No Comments

Tired of manually adding Holidays on the GoldMine Calendar?  Maybe you would like to add employee birthdays. You can add them to the Calendar settings so they display automatically.

To add Holidays to the Calendar:

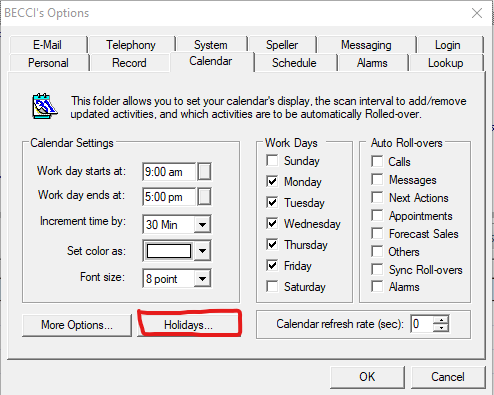
  1. Navigate to Tools -> Options
  2. Click on the Calendar tab and then click Holidays

  1. You may be asked to import a predefined set of holidays. If so, click Yes
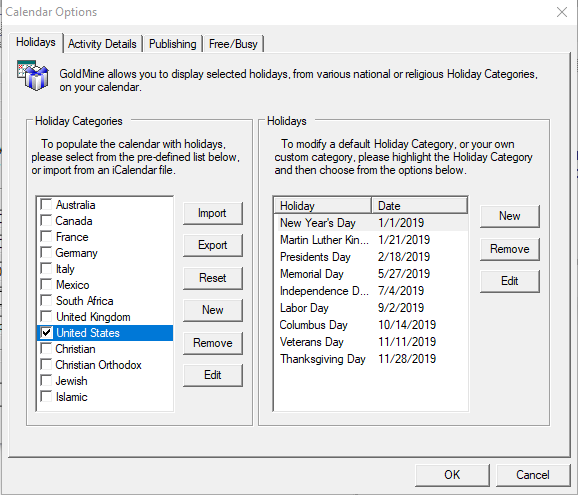
  2. The Calendar Options dialog box opens with the Holiday tab active.
  3. From the Holiday Categories list, select the type of holidays to display. Holidays for the selected categories display in the Holidays list.

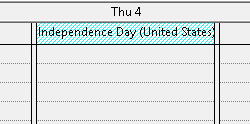
  1. Navigate to the calendar as you will see the Holidays on the date

To create a new Holiday Category:

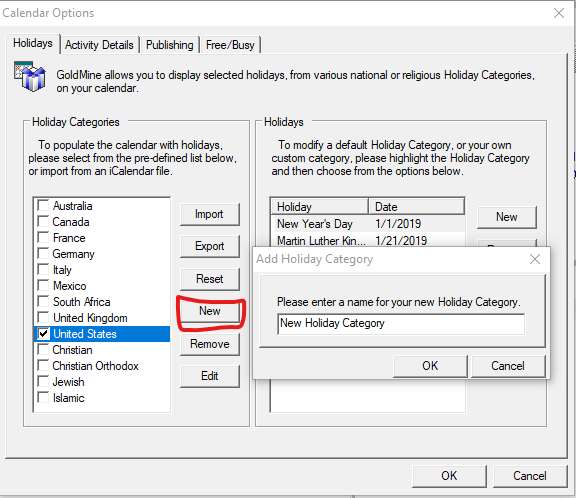
  1. Click New in the Holiday Categories section
  2. Enter the name in the Add a Holiday Category window.
  3. Click OK. The new category adds to the list.

  1. To remove a holiday category, click on the Remove button
  2. To edit a holiday category, click on the Edit button

To add a holiday to a Category:

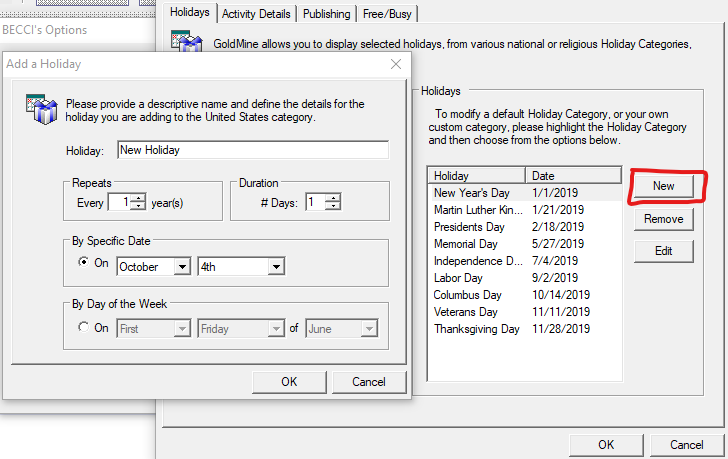
  1. Click New in the Holiday Section
  2. Enter the name of the holiday in the Holiday textbox
  3. Select how often the holiday repeats in the Every: x year(s)
  4. Select the number of days the holiday lasts in the # Days: field.
  5. Enter a specific date for the holiday or select the week, the day of the week, and the month in the drop-down lists.
  6. Click OK.

  1. To remove a holiday, click on the Remove button
  2. To edit a holiday, click on the Edit button

GoldMine – Restoring the GoldMine Database

By CRM, GoldMine CRM No Comments

As the GoldMine Administrator you may need to restore the GoldMine database after making changes, running updates, etc.

To Restore a SQL Database:

  1. Open SQL Server Management Studio.
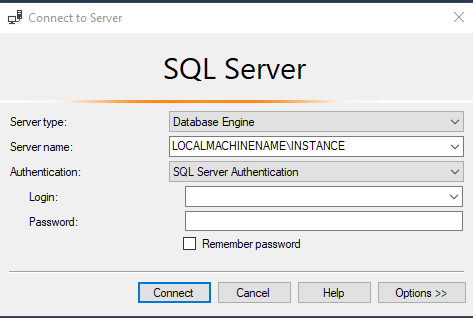
  2. Connect to SQL Server.

The server name should be the LOCALMACHINENAME\INSTANCENAME

Authentication:  SQL Server Authentication

Login: sa username

Password: sa password

  1. Click the Connect
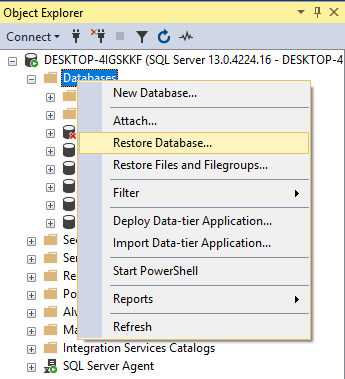
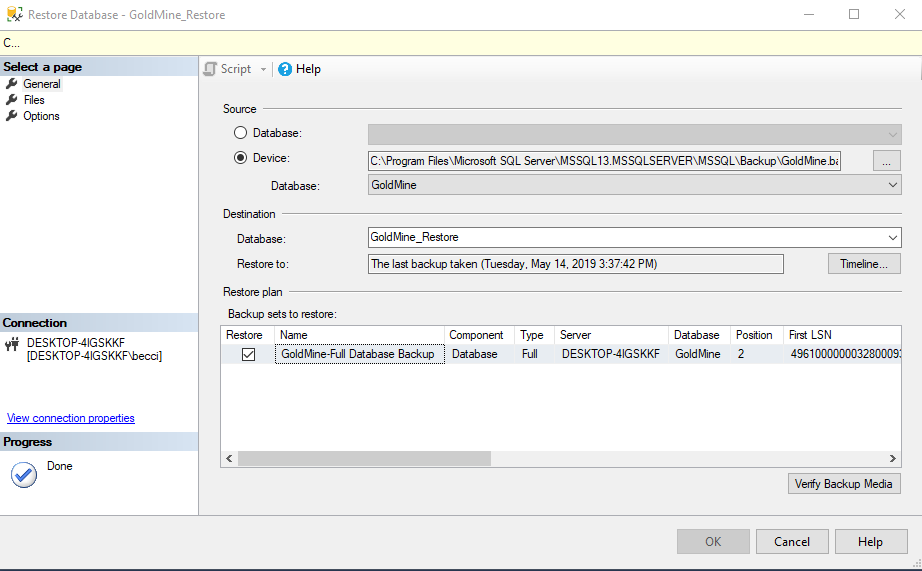
  2. Right-click the Databases section and choose Restore Databases. The Restore Database – GoldMine window opens.

  1. Select Device and click on the Browse button (…).
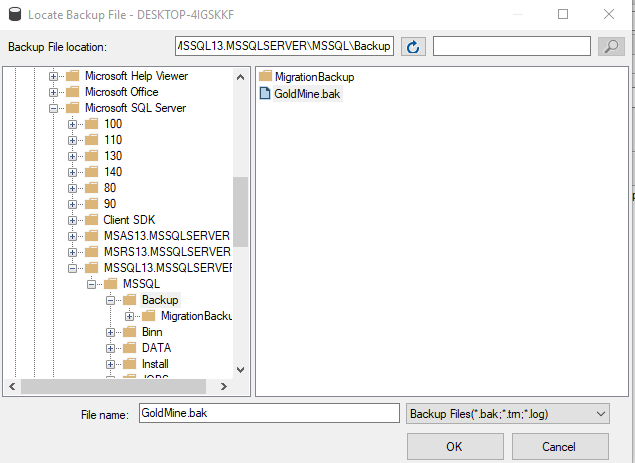
  2. Navigate to the folder location of the backup file. (e.g., C:\GoldMIne\Backup) on the left and select the .bak file to restore on the right.

  1. Click OK.
  2. Select the backup file and then click OK
  3. The Restore Database window will load the files names and locations.
  4. CHANGE THE DATABASE name to GoldMine_Restore.
    1. If you do not change the name it will overwrite your current data

  1. The location/file path will display in the list. Click on it to select.
  2. Click the OK button at the bottom of the window. The restore will begin.  If the OK button is not enabled, click on the Verify Backup Media.  The OK button will then be enabled.
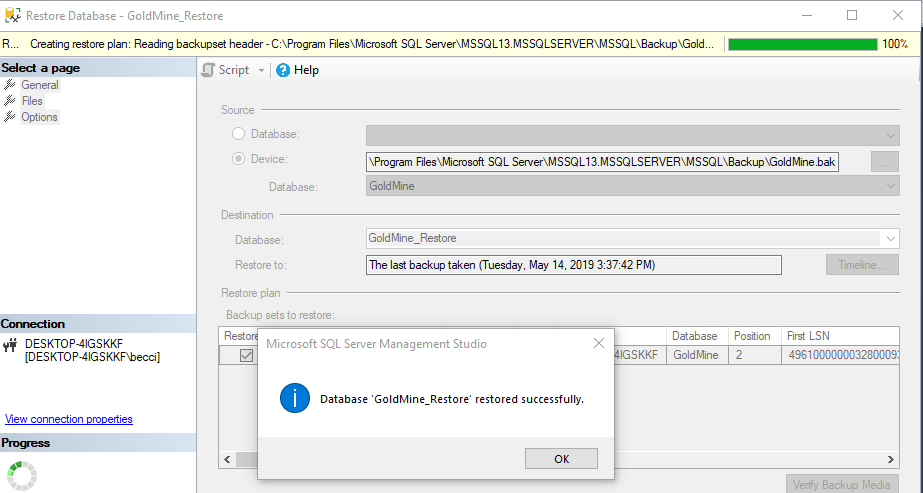
  3. Progress will be displayed at the top of the window.
  4. When the backup is done a message will display.

  1. Click OK and the windows will close.
  2. The database name (e.g, GoldMine) will be added to the Databases list on the left. The data files are now connected from the SQL Server and can used in applications and queries.
  3. If you don’t see the database name in the list and you did not receive an error, right-click on the Databases section and choose Refresh.

GoldMine – Detach and Attach the GoldMine Database

By CRM, GoldMine CRM No Comments

As the GoldMine Administrator there may be times when you need to detach and/or attach the GoldMine database.  Some examples would be to move or copy the files, remove or add a restored database or when connecting other databased to the SQL Server.

To Detach a SQL Database:

  1. EVERYONE MUST BE LOGGED OUT OF GOLDMINE.
  2. Open SQL Server Management Studio.
  3. Connect to SQL Server.

The server name should be the LOCALMACHINENAME\INSTANCENAME

Authentication:  SQL Server Authentication

Login: sa username

Password: sa password

  1. Click the Connect
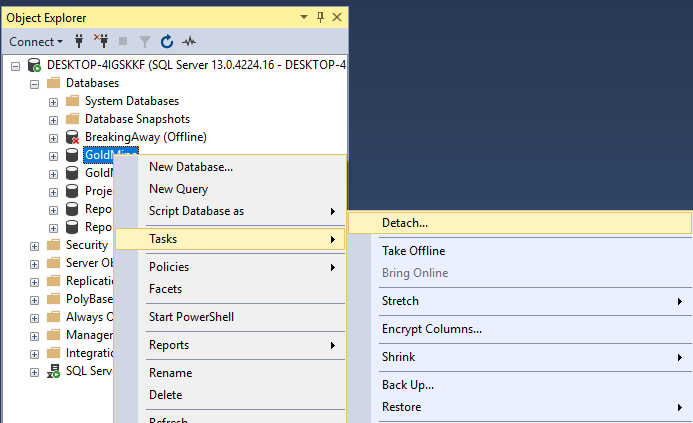
  2. Expand the Databases section in the Object Explorer on the left.
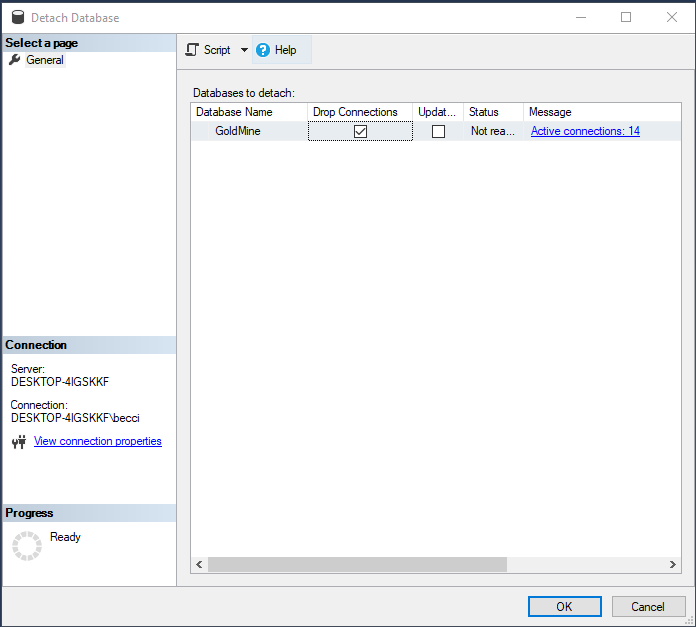
  3. Right-click on the database to detach and choose Tasks –> Detach. The Detach Database window opens.

  1. If there is a message that there are still active connections, check the box under Drop Connections.

  1. Click OK to detach the database.
  2. The database name (e.g, GoldMine) will be removed from the Databases list on the left. The data files are now disconnected from the SQL Server and can me moved, copied, etc.

To Attach a SQL Database:

  1. Open SQL Server Management Studio.
  2. Connect to SQL Server.

The server name should be the LOCALMACHINENAME\INSTANCENAME

Authentication:  SQL Server Authentication

Login: sa username

Password: sa password

  1. Click the Connect
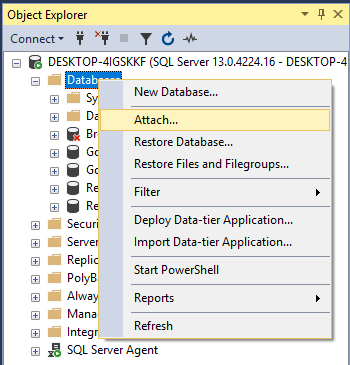
  2. Right-click on the Databases section in the Object Explorer on the left and choose Attach. The Detach Database window will open.

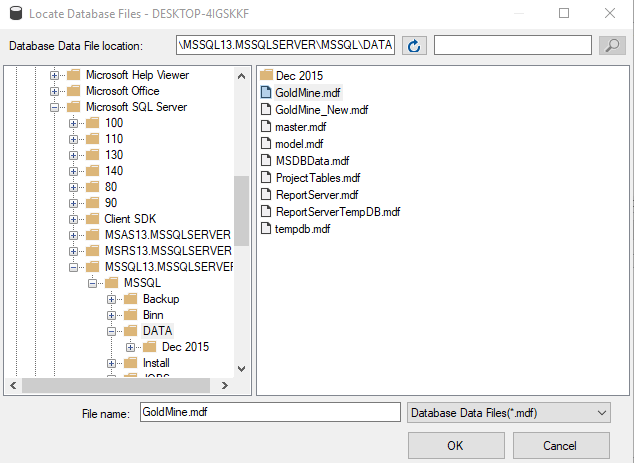
  1. Click the Add The Locate Database Files window opens.
  2. Navigate to the folder the backup is in on the left and select the actual backup file on the right.

  1. The database will display under Databases to attach and the file details will display in the lower section. Click OK to attach the database.
  2. The database name (e.g, GoldMine) will be added to the Databases list on the left. The data files are now connected from the SQL Server and can used in applications and queries.
  3. If you don’t see the database name in the list and you did not receive an error, right-click on the Databases section and choose Refresh.

GoldMine – Backing Up the GoldMine Database

By CRM, GoldMine CRM No Comments

Before you make changes to the GoldMine database such as importing records, doing multiple merge purge actions, or global replaces, a quick backup of the can be a life saver.  Backing up the database will also be needed if you are moving the server or saving archives.

To back up the GoldMine database:

  1. Open SQL Server Management Studio.
  2. Connect to SQL Server.

The server name should be the LOCALMACHINENAME\INSTANCENAME

Authentication:  SQL Server Authentication

Login: sa username

Password: sa password

  1. Click the Connect
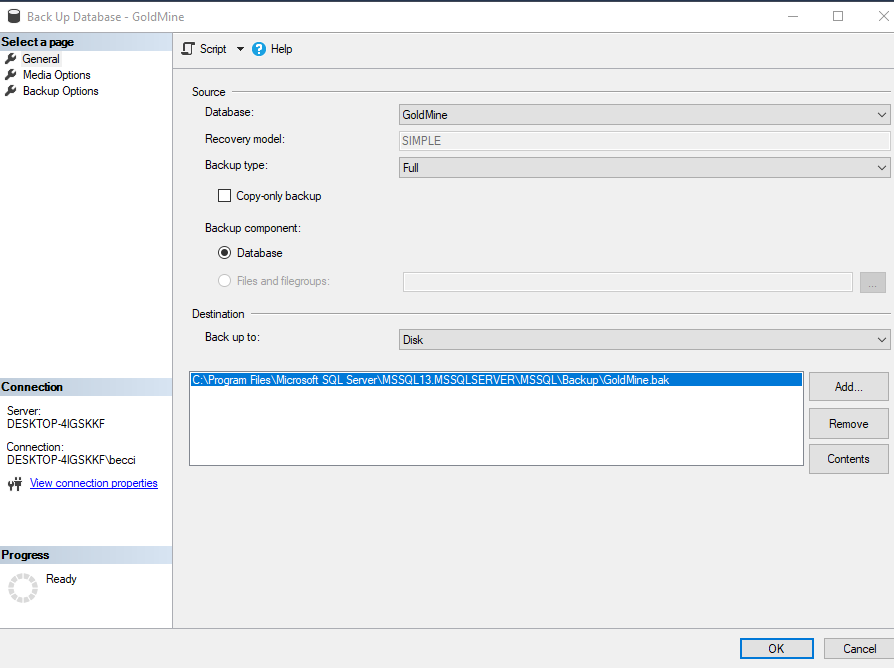
  2. Expand Databases on the left and right click on GoldMine. Choose Tasks –> Back Up.  The Back Up Database – GoldMine window opens.

Database:  GoldMine

Recovery Model:  SIMPLE

Backup Type:  Full

Backup component:  Database

Back up to:  Disk

If a database location is displayed, select it and click the Remove button.

Click the Add Button and then click the Browse (…) button to navigate to the location you want to store the backup file. (e.g., C:\GoldMIne\Backup).

Enter a File name:  e.g., GoldMineBackup5-8-19.bak

  1. Click
  2. The location/file path will display in the list. Click on it to select.
  3. Click the OK button at the bottom of the window. The backup will begin.
  4. Progress will be displayed in the bottom left of the window under Progress.
  5. When the backup is done a message will display.

  1. Click OK and the windows will close.

GoldMine: Creating a Group Based on a Filter

By CRM, GoldMine CRM No Comments

Groups are static and based on membership.  Filters and SQL queries, on the other hand, are dynamic and based on the field criteria by which they are built.  Creating a group based on a filter or query allows for a stable list of contacts (originally based on field criteria) that can be added to or removed from by manually adding or deleting a contact’s membership to that group. Read More

GoldMine: Adding a Picture to the GM+View Tab

By CRM, GoldMine CRM No Comments

There may be times when you are in need of quickly viewing a picture.  Some examples would be a picture of a person to verify their identity or images of property you are insuring.

Linking the image on the Links tab is helpful as you can view it in the Preview Pane.  But if you have many linked documents and don’t want to search, you can display the image on the GM+View tab so it can be accessed with a click of the tab. Read More

GoldMine: Power Searches

By CRM, GoldMine CRM No Comments

The Contact Search Center has more functionality than just finding the contact whose record you want pulled up.  It also allows for displaying the contacts of filters or groups and lets you print out the results or output them to another application for further manipulation.  When a report doesn’t pull the data you want, a Power Search just may be the answer! Read More

Skip to content