When I first started using Voice of the Customer (VoC) Surveys, I was under the impression that you could only view survey responses by clicking into each individual survey response. This is great if you need to drill down into a specific survey response (eg. Investigating low customer satisfaction scores), but so painful for broader analysis! Thankfully, there’s a decent out-of-the-box report called ‘Survey Summary’ that we can use–and it’s a good template to start from for a customized report. In this tip, we’ll walk through each method to view the responses. Read More
This tip is meant to save yourself a little time (every second counts, right?) when completing forms in CRM.
Sometimes fields can be filled in on forms by default if the response is typically true under X condition(s). For example–you might know that if an opportunity or lead is related to Product X or Y, it applies to Business Unit A, while if the interest is in Product Z, it applies to Business Unit B. You use a Business Rule on a form to set the conditions and default values. Being default values, they can be changed after they are set. Read More
Let’s say you just created a personal view that you want to allow others to use–what do you do? Share it! Dynamics 365 makes this really easy. This is especially helpful for teams or collaborators that want to leverage.
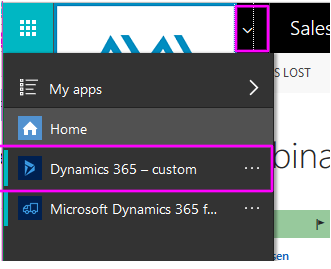
Hello again! Back this month with a quick customization tip that makes a big impact. You may have noticed the My Apps menu at one point or another, if you’ve selected this carrot:

Notice the generic name for your Dynamics 365 Instance? We’re going to update that. Read More
In other posts this month, we enabled Duplicate Detection and set up a custom Duplicate Detection rule. In this post, we’ll run a duplicate detection job and merge records. Begin by signing on to Dynamics 365 and select Settings-> Data Management, then Duplicate Detection Jobs: Read More
Your garage isn’t the only thing in need of some Spring Cleaning! In this post, I’ll talk about why it is so important to maintain accurate records and show you how to turn on Duplicate Detection in Dynamics 365. This post was inspired by a great article on it.toolbox.com. Read More
This post is a fun one–we’ll be uploading your organization’s logo to your instance of Dynamics 365. Easy. High-impact. Gotta love it! Bonus: we’ll upload a profile picture, too.
If you’ve always wanted to change the Main Tile names in your Dynamics CRM instance, you are in luck! One awesome new feature in Dynamics 365 is the ability to rename the Main Tiles. This new enhancement is so great for clients with different Business Units (Residential vs Commercial, Private vs Public, etc) or internal lingo that doesn’t jive with the default labels. We’ll also be touching on making changes to the Site Map–I’ll continue that discussion in the next blog.
We all know how frustratingly slow it can be to jump around between different entities, contacts, leads, opportunities in Dynamics..oy! In this post we’ll be discussing a very helpful new feature in Dynamics 365: “Pinning” Entities and Records in the “Recently Viewed Items” drop-down. You can actually pin Views, too!
As you are probably aware, Dynamics CRM is undergoing some changes and one of them is a new name, Dynamics 365. My blog posts this month will focus on some of the functionality updates available in v8.2 and our next meetup will review them in more detail. Be sure to sign up and join us!
Another cool, new feature is that you can group by fields directly from a view within CRM. You don’t have to create a report or export to Excel to group the data. In the customizations area, click on the name of the entity then open the Controls tab.

Then add a control and choose Editable Grid.

Finally, choose which devices you want to be able to use the editable grid control. Save and publish your changes.

Navigate to the entity and you will now see a box where you can specify how to group the records in the view. The options will be limited to the fields seen in the view. For example, if you want to group by State or Province you will need to add this field to the view first.


