Zoho now supports customizing your business hours, where you can specify different hours for each day. You can even create Shift hours, in specific time zones and assign to specific Users. Here’s how: Read More
Did you know Zoho has a “virtual meeting” application similar to join.me or GoToMeeting? Its called Zoho.Meeting. Once integrated with your Zoho CRM account, you can easily make any Event a virtual meeting with the click of your mouse. here’s how…
STEP 1: Set up integration with Zoho Meeting
- Setup->Marketplace->Zoho
- Click Install under the Zoho Meeting tile
- Click Continue
STEP 2: Create an Event record and Make it an online meeting
- While creating/Editing an Event Record, click the Make this an online meeting checkbox
- NOTE – You have to add a Participant before you save the event.

The participants will be able to join the meeting by clicking on the URL in the email.
For conducting the meeting, you can choose either of the audio preferencing methods: built-in method or add your own conference call service.
There is a monthy fee for the app, but as with all Zoho apps, there is a free trial period during which you can check it out!
Changing your subscription level from regular CRM to CRMPlus to Zoho One is super easy! Just login to your Zoho Account, then open a new tab and for CRM plus, type in crmplus.zoho.com – this will automatically put your account into a 30 day CRMPlus trial. For Zoho One, type in one.zoho.com.
When writing Custom functions in Zoho CRM, there are times that, when we add or update a record in the custom function, we need to trigger existing workflow. The only way to do this is to use the Zoho API within the custom function when adding/updating the record and set the trigger to workflow. With the new API 2.0, this can be a tad more cumbersome to first set up the “Client” get the refresh token and then copy and paste all the long strings into every custom function where you use the API. Enter Connections! It is soooo easy to set up a “Connection” for the CRM API, and then refer to that connection when invoking the URL – here’s how… Read More
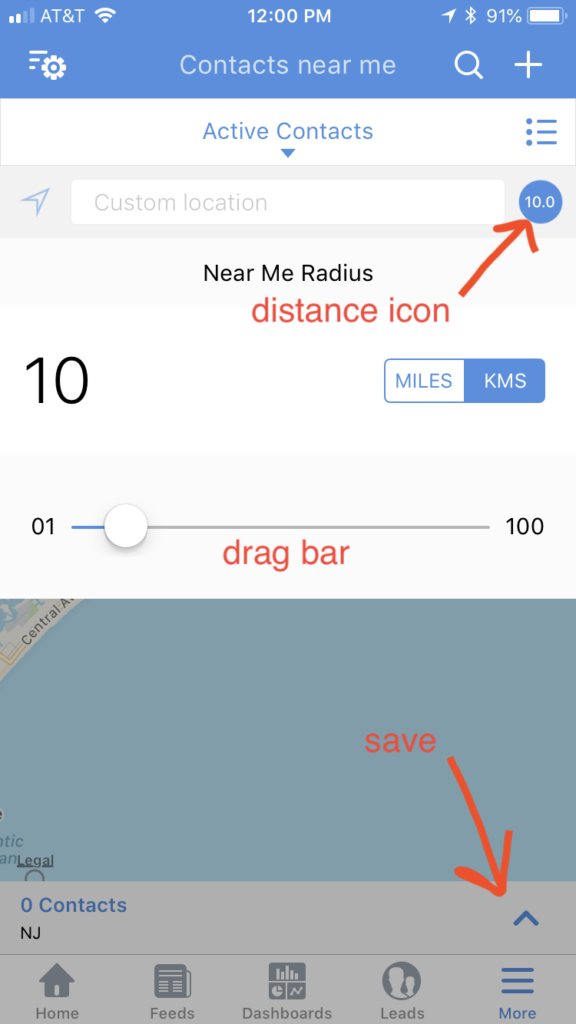
It’s now easier than ever to change the radius on the “Contacts Near Me” feature in the Zoho CRM mobile app. Just click the distance icon towards the upper right corner to open the slide bar. Move the slide bar to the desired radius and set the distance unit to either miles of kilometers, then click the up arrow towards the bottom right corner to save your changes. Where is the Contacts near me view you ask? Click Contacts, then click the map icon in the upper right area.

Sometimes in our CRM, we add another field where we can enter a phone extension for our contacts and Leads. Did you know that if you enter the phone number with its extension in the phone field, zoho crm will dial the extension too? The trick is to separate the phone number and extension by a “,” – so it should look like 800-555-1212,112. Phone systems interpret the “,” as a pause. You may need to enter two commas for it to work correctly. Try it!!
With the Zoho CRM – calendly integration you can email a link, or embed one on your website, that your customers can click and schedule an appointment with you based on your current availability! The Scheduled appointment will be added as an Event record in Zoho CRM. It can also be added to your outlook or Google calendar. You must also have a Calendly account, but there is a free trial and even a free version. Read More
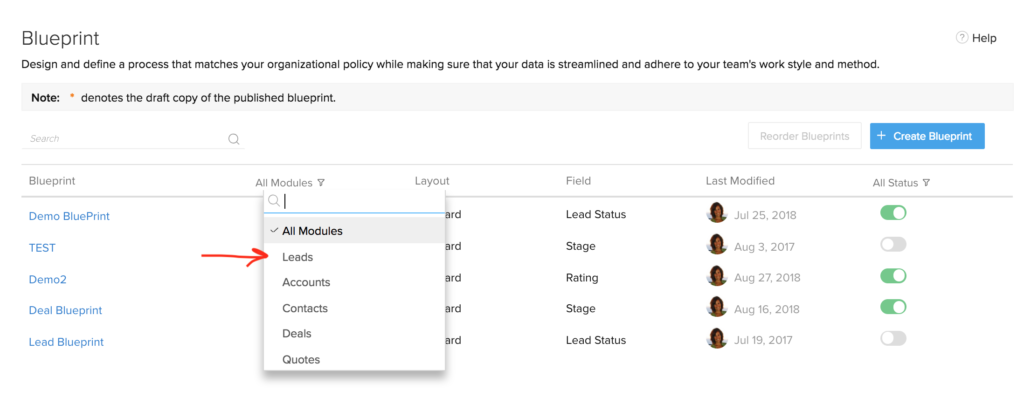
Did you know that you can run more than one Blueprint at one time?? You can even re-order Blueprints so that they execute in the desired order. Here’s how:
First you need to create your blueprints (Setup->Automation->Blueprints) *if you’re looking for more information on CREATING Blueprints, please check-out our marksgrouplive.com website – Blueprint module.
Once you have your blueprints created and activated, you can re-order them by first going to Setup->Automation->Blueprints:
- Select the module

- click re-order

- click and drag the grab bars to move the blueprints around

- click save
Zoho CRM has tools to manage data sharing across users. The main ones are the Role Hierarchy and the Data Sharing Rules, but these are on a module basis – you either share all the records in a module or none. There are also field permissions that you can set that will show/hide specific fields within a module. What if you wanted to be able to selectively share records across roles? That’s where the Record Share feature comes in! Here’s how you use it: Read More

