VisualForce pages allow you to create new pages in your Organization. They can be used to display data for reporting, pop-up windows, and custom user pages to name only a few. These steps are to get you started and familiar with the basics of how visualforce pages work.
When manipulating data in your page, a controller is needed. (See Salesforce Standard Controller for more information on controllers) The controller talks to your page and provides data as well as functionality. Each object has a standard controller that works behind the scenes as you are using Salesforce and VisualForce pages can use it too.
VisualForce pages can range for simple to extremely complex. Developers can use default markup or create custom styles and formats. For this example we will create a basic page so you can give it a try and see how it works.
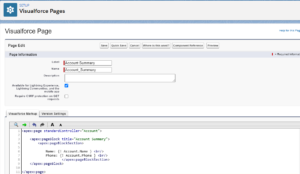
- Go to Setup (gear icon) and type Visualforce Page in the Search box. Click on Visualforce Pages in the list.
- All organization visualforce pages will be listed here. You can Edit, Delete, and set Security here. Click the New button to create a page.
- Give the page a name and check the box to make it Available for Lightning….
- Remove any markup on the page. Copy the following to the page.
<apex:page standardController=“Account”>
<apex:pageBlock title=“Account Summary”>
<apex:pageBlockSection>
Name: {! Account.Name } <br/>
Phone: {! Account.Phone } <br/>
</apex:pageBlockSection>
</apex:pageBlock>
</apex:page>
This markup will connect the page to the Standard Account Controller
<apex:page standardController=“Account”>
It then starts a pageblock or section with the title of Account Summary to be displayed
<apex:pageBlock title=“Account Summary”>
<apex:pageBlockSection>
Two Account fields are added to the page. Each line contains the text for the label, the <objectname>.<fieldname> surrounded by {! }. This markup tells the page to get Account data and display the Name and Phone fields for the record that is currently open. The <br/> markup tells the page to do a line break after the data.
Name: {! Account.Name } <br/>
Phone: {! Account.Phone } <br/>
At the end of each page/section you must end your markup.
</apex:pageBlockSection>
</apex:pageBlock>
</apex:page>
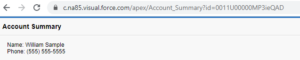
- Click the Quick Save button. And then click the Preview button. If all is well, your page will preview (without data) in a new tab.

- To preview your page with data, go to another tab and navigate to an Account record. Copy the ID from the URL.
https://na85.lightning.force.com/lightning/r/Account/0011U00000MP3ieQAD/view
- Go to your preview screen and starting at the end of the URL type “?id=” (without the quotes)
https://c.na85.visual.force.com/apex/Account_Summary?id=0011U00000MP3ieQAD
- Refresh the page and you will not see data from the open Account record.
- Next we will add the Contacts related list. Place your cursor after the </apex:pageblock> markup line and press Enter. Copy the follow code:
<apex:relatedList list=”Contacts”>
</apex:relatedList>
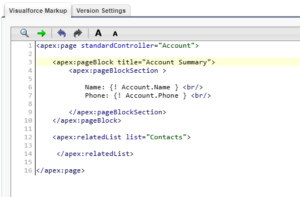
This markup will add the related list for Contacts and display the default contact fields from the view.
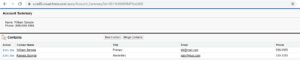
- Continue to add fields and formatting until your page is what you need. Save and close.
- One way to display your page is via a button on the Account page (see Open a VisualForce page with a Button). Another is from the Home page Dashboard.
